
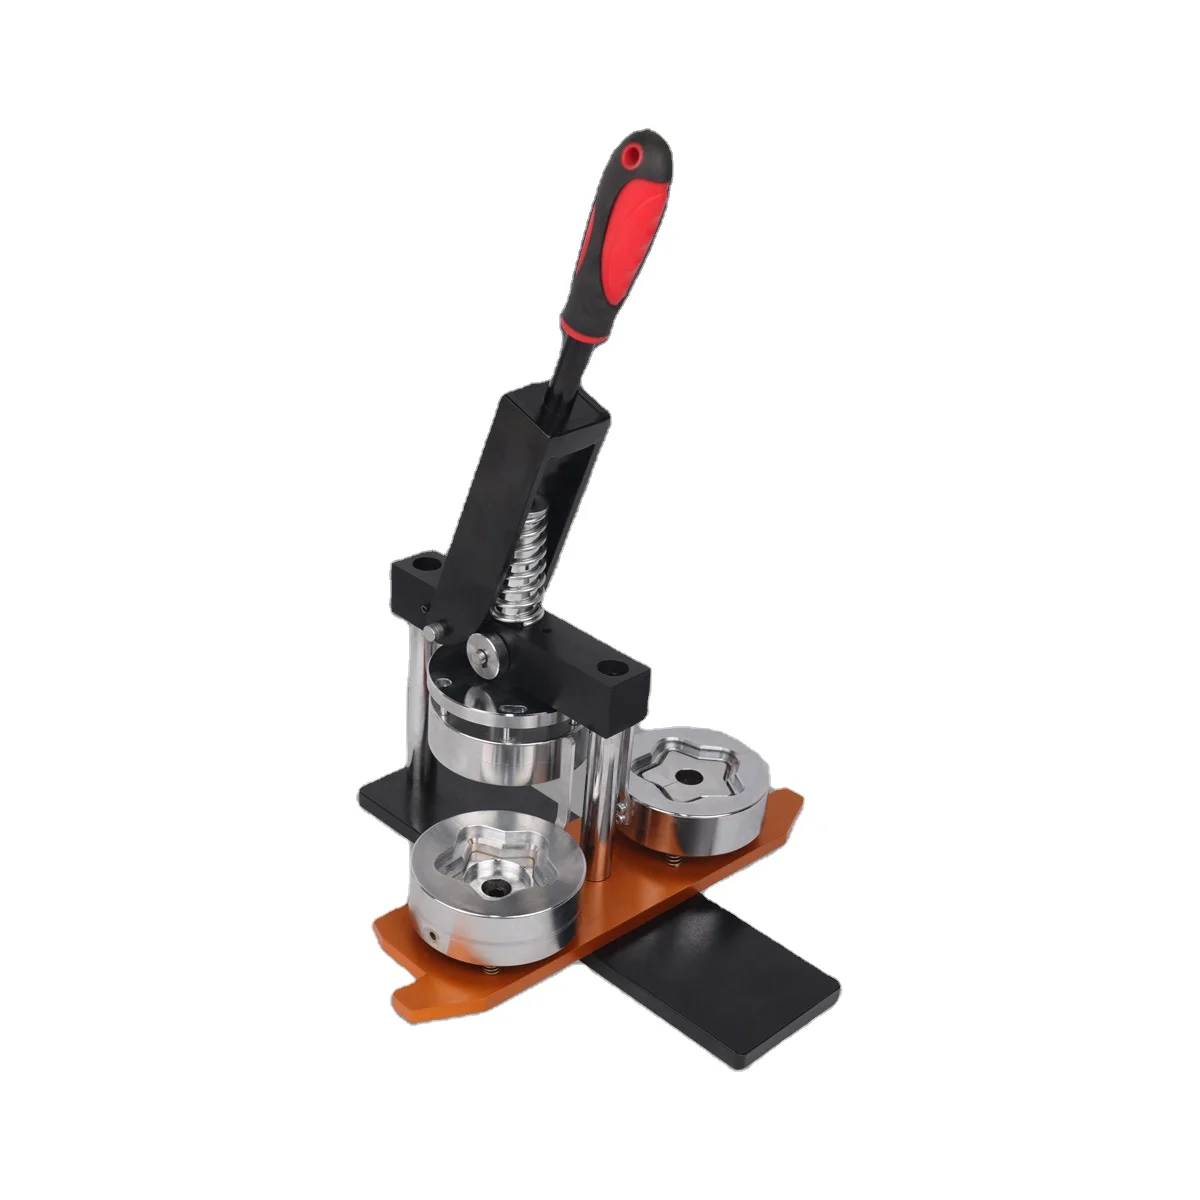
Source-controlled product identity
The Hoting queue identifies Product ID 1601285180281 as a factory-direct special-shaped badge machine for star-shaped badges. The source lists a 58*58mm format and a package containing one 58mm*58mm star shape button maker machine, one metal cutter and 100pcs badge parts.
The source description gives a manual workflow: prepare pictures, print them on normal paper, cut the picture to the proper size with a circle cutter or metal cutter, set the top and bottom moulds, place the metal cover, picture and transparent film, press the badge machine, then add the pin on the bottom cover.
This guide treats those steps as the recorded supplier workflow. It does not convert the listing into claims about cycle time, pressing force, yield, materials, certifications or long-term durability. Those items require a supplier confirmation and a buyer-specific sample test.
The guide is written for event agencies, schools, museums, campaign teams, retail promotions, maker spaces, print shops and small-batch merchandisers that need a non-round badge format. Its purchasing focus is special-shape tooling, artwork preparation, cutter alignment, mould setup, component compatibility, operator training and measurable acceptance testing.
Recorded specifications
| Field | Source value | Procurement meaning |
|---|---|---|
| Product ID | 1601285180281 | Use this ID on the quotation, purchase order, packing list and acceptance report. |
| Product format | Special-shaped badge machine | Confirm the supplied tooling is for the stated star shape, not a standard round badge. |
| Badge shape | Star shape | Request a finished-profile drawing and define points, valleys and edge tolerances. |
| Badge size | 58*58mm | Confirm whether this describes the finished badge, metal cover, paper cut or mould cavity. |
| Included machine | 1 x 58mm*58mm star shape button maker machine | Confirm the machine, upper mould, bottom mould and any required forming parts. |
| Included cutter | 1 x metal cutter | Verify that the cutter matches the star profile and supplied mould system. |
| Included badge parts | 100pcs badge parts | Request a component-level count and clarify whether these are complete sets or individual parts. |
Confirm the star profile before ordering
A special-shaped badge is controlled by the relationship between the metal cover, paper blank, transparent film, moulds and back cover. The phrase “58*58mm star shape” is not enough to define the finished geometry.
Request a dimensioned profile drawing showing the overall width, overall height, point radius, valley radius, symmetry, corner condition and any allowable tolerance.
Confirm whether 58*58mm is measured across the widest and tallest points of the finished badge, the blank, the metal cover, the cutter or the mould cavity. Record the supplier's answer in the purchase order.
Ask for a sample finished badge before approving a larger order. Inspect the star points, valleys, edge closure, film coverage, print alignment and back-cover fit.
Confirm whether the star mould is dedicated to this product or interchangeable with other special shapes. If interchangeable, request a tooling list and changeover instructions.
Ask whether the buyer may order additional star sizes or profiles later. Do not assume a round-button die or a different star profile can be used with this machine.
Define the finished-profile tolerance with a physical sample. A nominal dimension without a profile tolerance can still create visible differences between batches.
Request the mould material, surface finish, heat treatment if applicable and recommended service life. These fields are not supplied in the source record.
Package contents and the 100-piece kit
The source lists one machine, one metal cutter and 100pcs badge parts. Ask for a complete packing list before payment.
Clarify whether “100pcs badge parts” means 100 complete badge sets or 100 individual covers, backs, films, pins or other components. The wording does not resolve this.
Request a component breakdown for each set. It should identify the front metal cover, printed paper blank, transparent film, back cover, pin and clutch or the actual components supplied in this design.
Confirm whether the 100-piece kit is intended for testing, sample production or saleable output. If it is a sample kit, obtain the repeat-order specification for replacement parts.
Check that the front and back components are compatible with the 58*58mm star tooling. Mixed shapes or dimensions can appear to be machine defects.
Inspect covers for dents, burrs, scratches, deformation and inconsistent finish. Inspect pins and fasteners for secure attachment and correct orientation.
Confirm whether transparent film is included. The process description uses transparent film, but the package list shown in the source does not separately itemize it.
Ask for the replacement-part MOQ, lead time, packaging and price. A machine is not procurement-ready without a repeatable source for compatible star-shaped parts.
Request photographs or a video of the complete packed kit, with each component visible and counted.
Artwork and paper preparation
The recorded workflow begins with preparing pictures and printing them on normal paper. The source does not provide paper grammage, paper diameter, printer type, bleed, color standard or artwork template.
Request a star-shaped artwork template that shows the visible area, fold area, bleed, safe zone, point orientation and registration reference.
Confirm whether the picture must be cut as a star or as another blank shape before pressing. The supplier's cutter and mould drawing should resolve the required blank geometry.
Test artwork with fine text, photos, full-bleed color, high-contrast lines and artwork extending toward the star points. Points and valleys can expose alignment problems.
Run the buyer's actual paper stock rather than relying on a generic “normal paper” description. Record paper thickness, stiffness, coating, moisture and print coverage.
Confirm the cutting allowance between the printed picture and transparent film. Too little allowance can expose the edge; too much can wrinkle during forming.
Keep paper lots identified and stored flat. Curled or damp blanks can affect the star points and edge closure.
Request a cutter guide for the supplied metal cutter. Confirm how the picture or film is positioned, how the cutter is secured and how the operator avoids shifting.
Do not approve the artwork process until a sample shows the intended picture centered inside the star profile with acceptable point alignment.
Metal cutter verification
The source lists one metal cutter. Ask the supplier whether it is a manual die, punch, circle cutter, profile cutter or another design; the description uses both circle-cutter wording and a special star-shaped product context.
Request the cutter's exact profile, cutting size, material, edge condition, handle or fixture, and compatibility with the 58*58mm star badge system.
Test the cutter on the buyer's paper and transparent film if the cutter is intended for either material. Record incomplete cuts, burrs, tearing and edge deformation.
Confirm how the cutter is aligned with the printed artwork. A sharp cutter cannot correct an inaccurate print or an incorrect template.
Inspect the cutter for exposed sharp edges and define a safe storage location. Provide operator instructions for loading, cutting, clearing waste and cleaning.
Ask whether replacement blades, sharpening, maintenance or a replacement cutter can be supplied. No cutter life or maintenance value is provided.
Separate cutter defects from paper defects during acceptance. Use the same paper and a known-good artwork file for comparison.
Check the cutter against the mould profile using a physical blank. Do not accept a visual similarity alone if the finished badge requires consistent point and valley registration.
Mould setup and press sequence
The supplier workflow says to set the top mould and then set the bottom mould on the machine. Request a diagram showing orientation, locating pins, stops, fasteners and the correct installation sequence.
Label the top and bottom moulds and mark the star orientation. A rotated or inverted mould can produce a badge with the wrong point direction or damaged edges.
Confirm whether the moulds are pre-installed or shipped separately. If shipped separately, ask for a setup video or illustrated instruction before the first operation.
Check that the top mould and bottom mould are the matched 58*58mm star set. Do not mix moulds from another shape or size.
Inspect mould surfaces for chips, burrs, contamination and damage before placing a metal cover.
Use the supplier's sequence: place the metal cover into the top cover mould, place the picture on the cover, place transparent film over the picture, and press the badge machine. Confirm the actual die order because the description may summarize multiple manual stages.
After the front is formed, follow the supplier's instruction for adding the pin on the bottom cover and placing it in the next mould stage. The source does not provide the complete back-forming diagram, so this must be demonstrated during sample approval.
Record handle movement, required force, part location and any point where the operator must stop and reposition the workpiece.
Define a safe procedure for clearing a misloaded cover, film or paper. Do not reach into the mould area while the handle or press mechanism can move.
Sample quality and acceptance
The source does not state pressing speed, force, output or yield. Convert the buyer's quality requirements into a controlled sample test.
Prepare a known artwork, the intended paper, the supplied transparent film if included, and a complete set of compatible star components.
Record the sample count and separate defects into profile, alignment, edge closure, surface, back attachment, pin orientation, film and component categories.
Inspect the star points and valleys first. These areas are most likely to show incomplete forming, wrinkles, exposed paper or metal deformation.
Check that the picture remains centered after forming. Measure the visible margin or use a defined visual acceptance standard agreed before production.
Check that the transparent film covers the intended visible surface without bubbles, folds, scratches or exposed edges.
Inspect the front cover for dents, cracks, sharp edges, coating damage and incomplete closure.
Inspect the back cover and pin for secure assembly, correct orientation and movement appropriate to the buyer's use.
Run first, middle and last samples from the 100-piece kit to identify variation in parts or operator setup.
Repeat the test after the machine has been operated for a defined interval. The source does not provide a duty cycle, so the buyer should set a practical test duration for the intended work.
Sign acceptance only when the profile, alignment, component fit and safety criteria are met. Do not use the supplier's quality wording as a substitute for recorded samples.
Operator training and workflow control
Train operators on artwork preparation, paper cutting, mould orientation, front assembly, film placement, press operation and pin attachment.
Keep one approved reference badge at the workstation. Use it to compare star orientation, picture registration, point shape and back assembly.
Create a setup card with the top mould, bottom mould, cutter, component kit and artwork template shown together.
Separate clean components from waste paper, metal scraps and rejected badges. Waste can contaminate the mould or scratch the film.
Use a first-piece approval at the start of every artwork or component lot. Record operator, paper, artwork file, component lot and date.
Count accepted and rejected units. Classify every rejected unit instead of reporting only a general yield.
Store the special-shaped moulds and cutter together in labeled protection. Do not stack heavy tools on the star profile.
Clean the moulds and cutter according to supplier instructions. Avoid changing the profile or edge with unauthorized filing or grinding.
Request a maintenance schedule for pins, springs, fasteners, mould surfaces and cutting edges. No schedule is supplied in the source record.
Safety and handling
Request the machine manual and safety instructions before operation. The source record does not provide a full risk assessment.
Keep fingers outside the mould and pressing area. Train operators to use the handle only from the intended position and to stop before clearing a misloaded part.
Store the metal cutter with its cutting edge protected. Use the supplier's safe method for carrying, cleaning and removing cut waste.
Inspect the frame, handle, pivots, fasteners and mould locating parts before each shift or campaign batch.
Do not operate with a loose mould, cracked frame, damaged handle, exposed sharp edge or missing fastener.
Keep paper scraps and metal waste away from the press base and handle path. A clean work surface improves both safety and repeatability.
Use task-appropriate eye protection when cutting paper, film or metal components. Confirm PPE requirements with the responsible safety professional.
Do not allow untrained users to operate the machine at public events, schools or maker spaces without supervision.
Define a safe procedure for mould changes, cutter cleaning, jam removal and storage. Never improvise a tool or press method that changes the intended load path.
Factory acceptance test
- Verify Product ID 1601285180281, the special-shaped format and star profile.
- Verify the 58*58mm size definition with a dimensional drawing and finished sample.
- Count one machine, one metal cutter and 100pcs badge parts.
- Clarify whether 100pcs means complete badge sets or individual parts and record the answer.
- Match the top mould, bottom mould, cutter and all components to the same star profile.
- Inspect mould surfaces, locating pins, fasteners, handle, frame and base.
- Demonstrate the supplier's picture preparation, cutting, mould setup, front forming and pin attachment sequence.
- Test the buyer's artwork, paper, transparent film and star-shaped components.
- Inspect points, valleys, picture alignment, film coverage, edge closure, front surface and back assembly.
- Record first, middle and last samples from the supplied component kit.
- Classify defects and agree corrective action for any failed sample.
- Demonstrate safe cutter handling, mould change, jam removal, cleaning and storage.
- Verify artwork template, cutting guide, setup instructions, safety manual and maintenance guidance.
- Confirm replacement cutter, moulds and star badge parts with MOQ and lead time.
- Sign acceptance only after the agreed profile, sample and safety criteria are met.
RFQ checklist
- Product ID 1601285180281, TEBAK or supplier brand marking, model and star-profile drawing.
- Finished size definition for 58*58mm, including profile dimensions and tolerance.
- Top mould, bottom mould, locating pins, cutter and forming-component drawings.
- Complete packing list for one machine, one metal cutter and 100pcs badge parts.
- Clarification of complete badge sets versus individual parts in the 100pcs kit.
- Metal cover, back cover, pin, clutch, transparent film and paper specifications.
- Artwork template, visible area, bleed, safe zone, point orientation and paper-cut method.
- Supplier's full press sequence, mould orientation, back-cover stage and operator guide.
- Press force, handle travel, duty cycle, output and yield only if supported by a defined test.
- Sample count, profile tolerance, alignment limit, edge-closure limit and defect taxonomy.
- Cutter material, edge specification, maintenance, replacement and safe handling method.
- Mould material, surface finish, expected service life and replacement availability.
- MOQ, sample, lead time, packaging, shipping protection, warranty and technical support.
- Replacement star-shaped components, moulds, cutter and transparent film replenishment.
Buyer decision framework
This source confirms a special-shaped star badge machine with a 58*58mm description, one machine, one metal cutter and 100pcs badge parts, plus a manual workflow for picture preparation, cutting, mould setup, front forming, transparent-film placement and pin attachment.
It does not confirm power, machine dimensions, press force, cycle time, output, material grades, mould tolerance, paper specification, film specification, certification or replacement-part lead time. Approve the purchase only after a finished-profile drawing, component breakdown, sample test and safety demonstration.
Compare suppliers by profile consistency, artwork registration, point and valley quality, cutter-to-mould matching, component replenishment, operator safety, documentation and total cost per accepted badge.
Frequently asked questions
What shape and size does this badge machine use?
The source describes a star-shaped badge machine and lists 58*58mm. Confirm whether that size refers to the finished badge, blank, mould cavity or another dimension.
What is included?
The source lists one 58mm*58mm star shape button maker machine, one metal cutter and 100pcs badge parts. Ask for a component-level packing list.
How are badges made?
The recorded workflow covers picture preparation, printing, cutting, top and bottom mould setup, metal-cover loading, picture and transparent-film placement, pressing and pin attachment. Request the full illustrated sequence for the delivered tooling.
Is a paper specification provided?
No paper grammage or detailed paper specification is provided. Test the buyer's actual paper and obtain a supplier-approved template and cutting guide.
Is output or pressing force specified?
No. Output, force, cycle time and yield should be established through a buyer-specific sample and acceptance test rather than inferred from the listing.
Can another star size be used?
Do not assume interchangeability. Request a tooling list and confirm whether additional star profiles or sizes are available.
Source and contact
This guide is based on the Hoting queue record for Product ID 1601285180281. It preserves the listed star shape, 58*58mm description, machine, metal cutter, 100pcs badge parts and recorded manual workflow. Request the final tooling drawing, component list, sample test, safety instructions and replacement-part quotation through the TEBAK sales inquiry channel.
Key specifications
- Source Product ID
- 1601285180281
- Product format
- Special-shaped badge machine
- Badge shape
- Star shape
- Badge size
- 58*58mm
- Included machine
- 1 x 58mm*58mm star shape button maker machine
- Included cutter
- 1 x metal cutter
- Included badge parts
- 100pcs badge parts